Инструкция подключения IPSec/L2TP на Windows
Windows 10 and 8.x
- Right-click on the wireless/network icon in your system tray.
- Select Open Network and Sharing Center. Or, if using Windows 10 version 1709 or newer, select Open Network & Internet settings, then on the page that opens, click Network and Sharing Center.
- Click Set up a new connection or network.
- Select Connect to a workplace and click Next.
- Click Use my Internet connection (VPN).
- Enter Your VPN Server IP in the Internet address field.
- Enter anything you like in the Destination name field, and then click Create.
- Return to Network and Sharing Center. On the left, click Change adapter settings.
- Right-click on the new VPN entry and choose Properties.
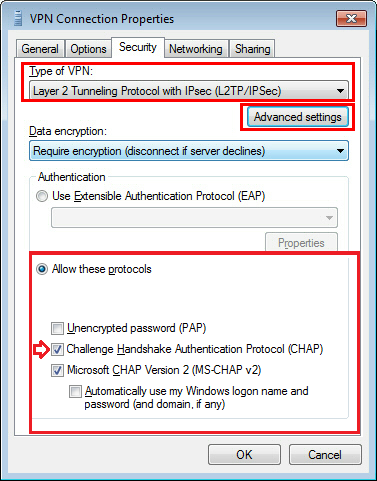
- Click the Security tab. Select "Layer 2 Tunneling Protocol with IPsec (L2TP/IPSec)" for the Type of VPN.
- Click Allow these protocols. Check the "Challenge Handshake Authentication Protocol (CHAP)" and "Microsoft CHAP Version 2 (MS-CHAP v2)" checkboxes.
- Click the Advanced settings button.
- Select Use preshared key for authentication and enter Your VPN IPsec PSK for the Key.
- Click OK to close the Advanced settings.
- Click OK to save the VPN connection details.
Note: A one-time registry change is required before connecting. See details below.
Windows 7, Vista and XP
- Click on the Start Menu and go to the Control Panel.
- Go to the Network and Internet section.
- Click Network and Sharing Center.
- Click Set up a new connection or network.
- Select Connect to a workplace and click Next.
- Click Use my Internet connection (VPN).
- Enter Your VPN Server IP in the Internet address field.
- Enter anything you like in the Destination name field.
- Check the Don't connect now; just set it up so I can connect later checkbox.
- Click Next.
- Enter Your VPN Username in the User name field.
- Enter Your VPN Password in the Password field.
- Check the Remember this password checkbox.
- Click Create, and then Close.
- Return to Network and Sharing Center. On the left, click Change adapter settings.
- Right-click on the new VPN entry and choose Properties.
- Click the Options tab and uncheck Include Windows logon domain.
- Click the Security tab. Select "Layer 2 Tunneling Protocol with IPsec (L2TP/IPSec)" for the Type of VPN.
- Click Allow these protocols. Check the "Challenge Handshake Authentication Protocol (CHAP)" and "Microsoft CHAP Version 2 (MS-CHAP v2)" checkboxes.
- Click the Advanced settings button.
- Select Use preshared key for authentication and enter Your VPN IPsec PSK for the Key.
- Click OK to close the Advanced settings.
- Click OK to save the VPN connection details.
Note: This one-time registry change is required if the VPN server and/or client is behind NAT (e.g. home router).
To connect to the VPN: Click on the wireless/network icon in your system tray, select the new VPN entry, and click Connect. If prompted, enter Your VPN Username and Password, then click OK. You can verify that your traffic is being routed properly by looking up your IP address. It should say "Your public IP address is Your VPN Server IP".
Troubleshooting
Windows Error 809
Error 809
The network connection between your computer and the VPN server could not be established because the remote server is not responding. This could be because one of the network devices (e.g, firewalls, NAT, routers, etc) between your computer and the remote server is not configured to allow VPN connections. Please contact your Administrator or your service provider to determine which device may be causing the problem.
To fix this error, a one-time registry change is required because the VPN server and/or client is behind NAT (e.g. home router). Download and import the .reg file below, or run the following from an elevated command prompt.
For Windows Vista, 7, 8.x and 10 download .reg file
REG ADD HKLM\SYSTEM\CurrentControlSet\Services\PolicyAgent /v AssumeUDPEncapsulationContextOnSendRule /t REG_DWORD /d 0x2 /f
For Windows XP ONLY download .reg file
REG ADD HKLM\SYSTEM\CurrentControlSet\Services\IPSec /v AssumeUDPEncapsulationContextOnSendRule /t REG_DWORD /d 0x2 /f
Although uncommon, some Windows systems disable IPsec encryption, causing the connection to fail. To re-enable it, run the following command and reboot your PC.
For Windows XP, Vista, 7, 8.x and 10. download .reg file
REG ADD HKLM\SYSTEM\CurrentControlSet\Services\RasMan\Parameters /v ProhibitIpSec /t REG_DWORD /d 0x0 /f
Windows Error 628 or 766
Error 628
The connection was terminated by the remote computer before it could be completed.
Error 766
A certificate could not be found. Connections that use the L2TP protocol over IPSec require the installation of a machine certificate, also known as a computer certificate.
To fix these errors, please follow these steps:
- Right-click on the wireless/network icon in your system tray.
- Select Open Network and Sharing Center. Or, if using Windows 10 version 1709 or newer, select Open Network & Internet settings, then on the page that opens, click Network and Sharing Center.
- On the left, click Change adapter settings. Right-click on the new VPN and choose Properties.
- Click the Security tab. Select "Layer 2 Tunneling Protocol with IPsec (L2TP/IPSec)" for Type of VPN.
- Click Allow these protocols. Check the "Challenge Handshake Authentication Protocol (CHAP)" and "Microsoft CHAP Version 2 (MS-CHAP v2)" checkboxes.
- Click the Advanced settings button.
- Select Use preshared key for authentication and enter Your VPN IPsec PSK for the Key.
- Click OK to close the Advanced settings.
- Click OK to save the VPN connection details.